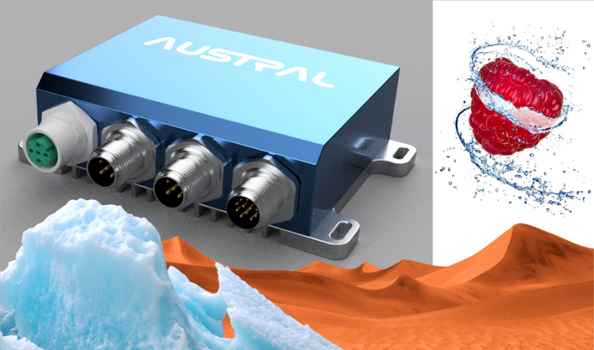
Quantum CM4 OEM - Rugged IP67 Mission Computer / IoT Gateway
www.austral-elec.com - Intelligent Technologies for Marine, Industrial IoT and Unmanned Vehicles
🔴🔴🔴 For new designs we recommend the Xplorer Product line 🔴🔴🔴
| Key Features | Benefits |
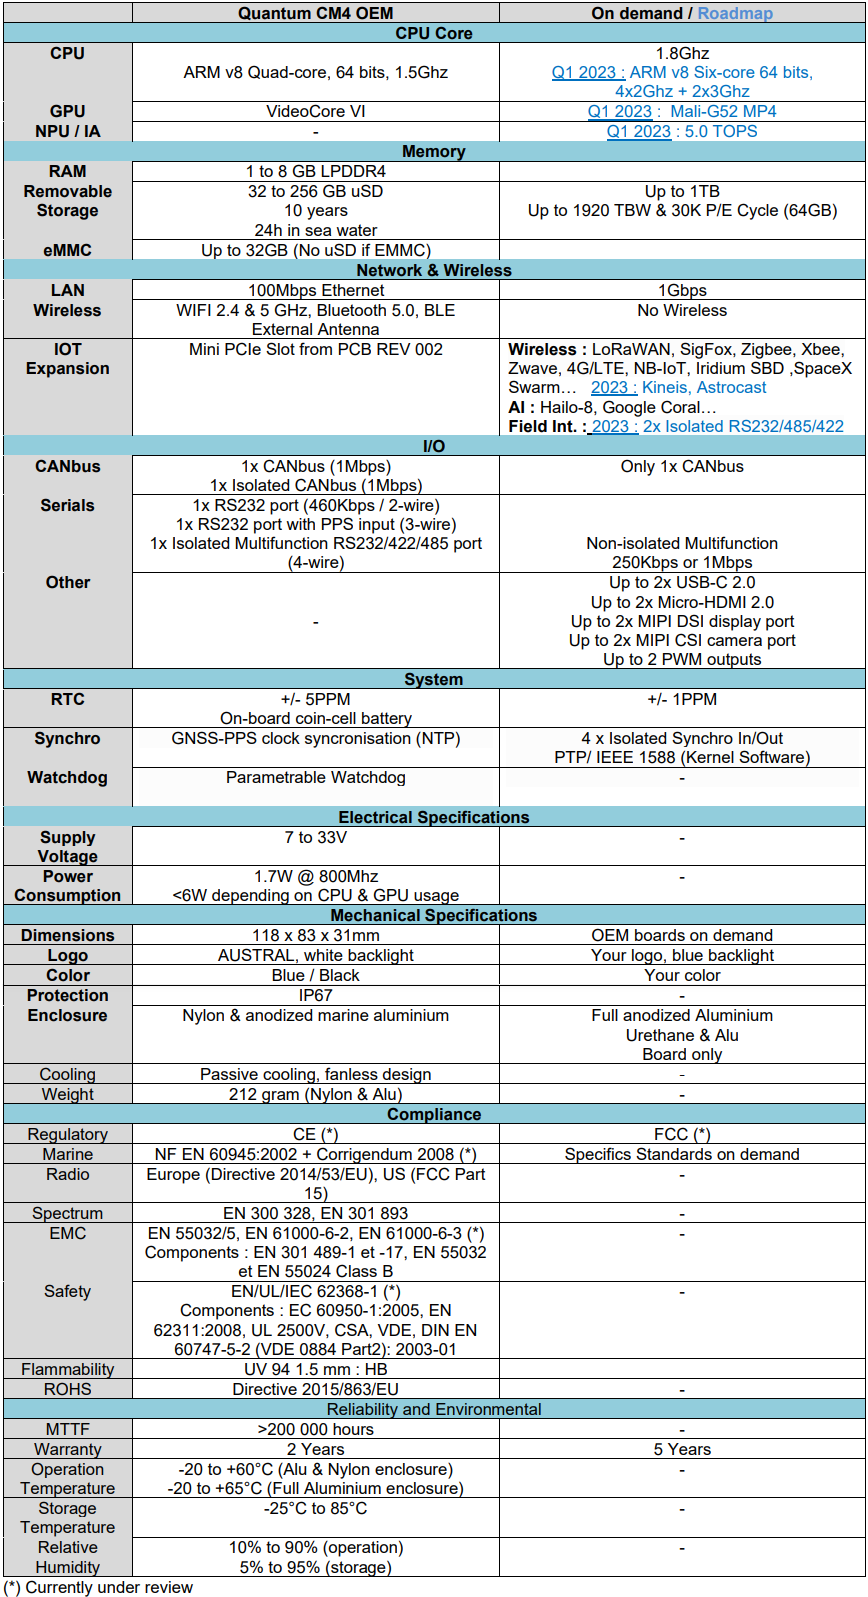
The Quantum CM4 is a SWaP-C platform : Cost-effective, Industrial, marinized IP67, -20 to +60/65°C temperature range, miniaturized, very lightweight (only 212g), very low power consumtion, fanless.... It integrates a powerful quad core ARM processor, many Industrial, Marine, and Automotive field buses, Galvanic isolation, Protections, Watchdog, RTC with GNSS Time synchronisation, Wireless and a huge storage for your datalogs.
|
|
Applications
The Quantum CM4 OEM is designed for ITAR-free, SWaP-sensitive and real-time applications using remote HMI. It will be embedded into a third-party system in a harsh environment, like wearable edge computing, boats, vehicles, drones, machines, outdoor and underground platforms… and for a wide range of use cases:
- Interfacing sensors, actuators and PLCs
- Data collection, Black box
- Marine IOT, IIOT, Cloud
- IA, Robotics, Command control, Guidance
- Asset tracking, Machine monitoring, Energy Management
- Building, boat and vehicle automation, Security systems, Climate control
- HTML5 Multifunction Displays Dashboards, Voice Assistant
Sectors : Marine, Industry 4.0, Drones, Robotics, Off-Highway Vehicles, Smart Farming …
Pricing & Ordering : Link to Austral Electronics page
Table of contents
- Hardware
- Operating system
- First connection
- Install Debian
4.1. Download a Debian image
4.2. Program the Micro SD-CARD
4.3. Program the EMMC
4.4. Network Boot/Download
4.5. Create your own Debian image from scratch
4.6. Configuration current issues - Test the peripherals
5.1. Get the system configuration
5.2. Change the system configuration
5.3. Ethernet
5.4. Wifi
5.5. Samba file server
5.6. Serials
5.7. CANbus
5.8. Real Time Clock
5.9. Logo backlight
5.10. Bluetooth
5.11. Watchdog
5.12. Optional PWM
5.13. Thermal Stress Test - Applications
6.1. Remove Applications
6.2. Tools
6.3. Protocols
6.4. Databases
6.5. Frameworks - Operating Systems Links
- Disclaimers
1. Hardware
Download a PDF Hardware specifications and installation : Here
2. Operating system
Quantum CM4 is a headless product, it is designed to have its man-machine interface distributed on all types of web browsers, marine MFD displays and industrial touch panels. If you don’t have real time constraints, you can of course install a linux, android or windows desktop distribution and develop via VNC but this is not the main purpose of this calculator.
We recommend the use of a Debian distribution if your system is not deployed in large quantities and you do not have a Linux specialist in your team. In the other cases, Austral Electronics in partnership with Linatsea can accompany you in the creation of a distribution adapted to your need: Buildroot, Yocto, Vxworks, Redpesk Marine Grade Linux, Victron Energy Venus OS, Automotive Grade Linux (AGL), Ubuntu Server/core, Over-the-air (OTA) update : Contact us
Usefull links for others Operatings Systems
3. First connection
With the pre-installed Debian or the configuration script settings :
Change the IP of your machine to 192.168.100.X
Power-up the Quantum and wait 20s for the end of the boot.
Launch a ssh console :
ssh quantum@192.168.100.100 The default password is : pass
On windows, you can open a ssh console using :
- DOS - On the command prompt, type ‘cmd’
- PowerShell
- MobaXterm Free - Automatic password entry, File browser & Editor, vnc…
- putty - To automate the password entry, the create a .bat shortcut : putty.exe -ssh quantum@192.168.100.100 -pw pass
Change the IP : link
Access/Modify to the samba share : link
4. Install Debian
In order to take advantage of the huge developer community on Raspberry PI, a great documentation and a Tier 3 support. The Quantum CM4 Processor is preinstalled with a Debian Linux optimized by the Raspberry PI Foundation and configured for the Quantum CM4 hardware. The OS comes with over 35,000 packages: precompiled software bundled in a nice format for easy installation. You can reinstall Debian from scratch by following this procedure.
Debian Long Term Support (LTS) is a project to extend the lifetime of all Debian stable releases to (at least) 5 years.
The choice of the version depends on the deployment date of your system.
Debian (future) LTS Releases, Supported by security and release teams:
- Debian 10 “Buster” July, 2022 to June, 2024
- Debian 11 “Bullseye” July, 2024 to June, 2026
4.1. Download a Debian image
- Debian 11.3 “Bullseye” Headless PREEMPT-RT, Ready-to-use (Rolling Release) : (coming soon)
- Debian 10 “Buster” Headless PREEMPT-RT, Ready-to-use (LTS) : (coming soon)
- Debian 11.3 “Bullseye” Headless PREEMPT-RT, to configure (Rolling Release) : here
- Debian 10 “Buster” Headless PREEMPT-RT, to configure (LTS) : here
4.2. Program the Micro SD-CARD
- Install the Imager, version >=1.7.2
- Download the .xz image of Debian 11.3 “Bulleye”
- Insert a Micro SD-Card in an USB3.0 Card Reader
- Launch the imager
- Choose a personalized image and select the downloaded image
- Select the SD-card
- Click on the gear icon to configure to the Advanced Options
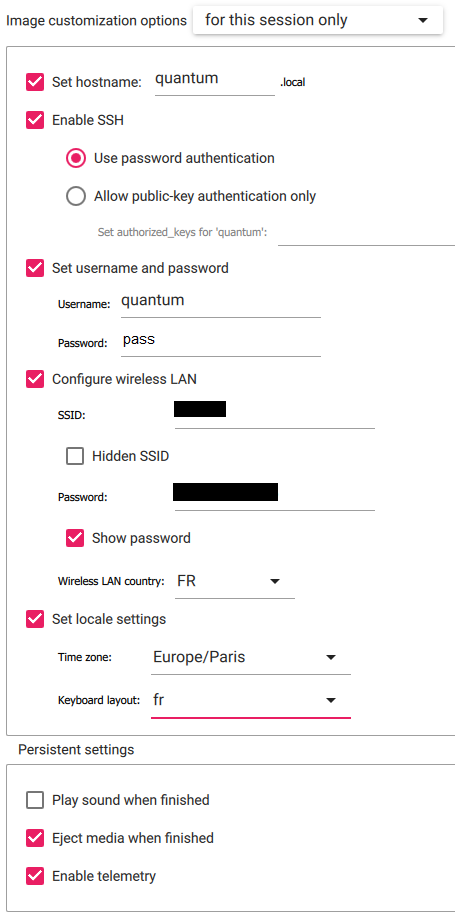
4.3. Program the EMMC
If you have a Quantum version EMMC and not micro SD-card, the procedure is slightly different.
On windows, install rpiboot
Connect the Quantum to Windows using a USB cable connected to the USB Slave port.
Boot the Quantum with the EMMC_BOOT switch ON.
The EMMC appears as a disc on windows that you have to select in the imager.
Switch back to OFF after programming.
4.4. Network Boot/Download
If you need to boot from a server or update remotely, a single or multiple Quantum, you will need a Network Bootloader.
The Raspberry PI fundation bootloader it is not suitable for a headless hardware. More
We recommend using Pre-boot eXecution Environment (PXE). Video1 - Video2 - Link1 - Link2
4.5. Create your own Debian image from scratch
If you want to build your own customized Debian image, you can follow this Tutorial that uses pi-gen tool.
Otherwise, the following example is the easiest way to create and deploy your own linux distribution with your applications pre-installed. You only need to customize a configuration script and somes settings (IP, password…).
Get Debian an image :
- Debian 11.3 “Bullseye” Headless PREEMPT-RT, to configure (Rolling Release) : https://downloads.raspberrypi.org/raspios_lite_arm64/images/raspios_lite_arm64-2022-04-07/
- Debian 10 “Buster” Headless PREEMPT-RT, to configure (LTS) : https://downloads.raspberrypi.org/raspios_lite_arm64/images/raspios_lite_arm64-2021-05-28/
Program the Micro SD-CARD or EMMC:
See above
Configure the default image for the Quantum CM4 Platform:
Verify the internet connection of the Quantum CM4 :
ping -q -c1 google.com &>/dev/null && echo online || echo offline
If you are ‘Online’, you can download and launch configuration script, otherwise verify your Ethernet or Wifi configuration :
bash <(curl -sL https://raw.github.com/austral-electronics/QuantumCM4/main/script/configure.sh)
Operations realized by the script :
- Update and upgrade Debian
- Configure Ethernet & Wifi
- Install peripherals libraries and configure them (I2C, SPI, RTC, CANbus, Serials, GPIO…)
- Install and configure Samba
- Configure Avahi (Bonjour/Zeroconf) for marine MFD Displays
- On request, install and configure for real-time usual services or applications in embedded systems:
Deployment : Shrink and backup the image:
Read the uSD-Card with win32 Disk Imager and a USB-uSD Interface. In ‘Device’ select the partition /boot -> G: Then ‘Read’
Shrink the image (that will then resize to the max size of the SD card on boot)
Installation (Linux machine / Win10/11 WSL2 or virtual box):
wget https://raw.githubusercontent.com/Drewsif/PiShrink/master/pishrink.sh
chmod +x pishrink.sh
sudo mv pishrink.sh /usr/local/bin
Usage :
sudo pishrink.sh xxxx.img
You can backup / share this compressed image.
4.6. Configuration current issues
I can’t find my IP address
By default the ip address is static and is 192.168.100.100, if you have modified and lost the IP Address :
- Use bonjour Protocol :
Install bonjour service on windows : https://support.apple.com/kb/DL999?locale=en_US
ssh quantum@quantum.local   -> Default password=austral
ifconfig
- Use nmap :
Install nmap : https://nmap.org/download.html Launch nmap to scan all DHCP ip addresses
nmap -sn 192.168.100.0/24
I have an SSH error ‘ECDSA host key for quantum.local has changed ‘
ssh-keygen -R quantum.local
The configure.sh script don’t work
-
Verify the internet connection of the Quantum CM4:
ping -q -c1 google.com &>/dev/null && echo online echo offline -
If you modify configure.sh script with an editor you may have a CRLF problem, you can clean it with :
wget https://raw.github.com/austral-electronics/QuantumCM4/main/script/clean_script.sh -O - bash
5. TEST THE PERIPHERALS
5.1. Get the system configuration
Linux :
uname -a                -> Linux Version (quantum 5.15.32-v8+ #1538 SMP PREEMPT Thu Mar 31 19:40:39 BST 2022 aarch64 GNU/Linux)
cat /etc/os-release     -> Debian version (PRETTY_NAME="Debian GNU/Linux 11 (bullseye)")
cat /etc/debian_version -> Debian version (11.3)
Memories :
cat /etc/fstab      -> Partitions
df -h               -> Disk usage
Cores :
htop                        -> Processors & Memory usage
cat /proc/cpuinfo           -> Processors models
vcgencmd measure_temp       -> Cores temperature
vcgencmd measure_clock arm  -> Current clock speed. you can try : arm core h264 isp v3d uart pwm emmc pixel vec hdmi dpi
vcgencmd measure_volts core -> Current Cores voltage
cat /sys/devices/system/cpu/cpu0/cpufreq/scaling_cur_freq -> Current clock
cat /sys/devices/system/cpu/cpu0/cpufreq/scaling_min_freq -> Min Clock
cat /sys/devices/system/cpu/cpu0/cpufreq/scaling_max_freq -> Max Clock
Debug :
dmesg -> View the system Log
5.2. Change the system configuration
sudo raspi-config
Enable/Disable a config in command line here
5.3. Ethernet
by default the ip address is static and is 192.168.100.100
To change IP :
sudo nano /etc/dhcpcd.conf

# Example static IP configuration:
interface eth0
static ip_address=192.168.100.100/24
To use DHCP :
# Example static IP configuration:
#interface eth0
#static ip_address=192.168.100.100/24
5.4. Wifi
To get the wifi IP address:
ipconfig
To get the access point status:
iwconfig ### 5.5. Samba file server <a name="samba"></a>
The default samba setting share the /home/quantum/git directory for development purposes.
We recommend adding a network drive ‘Q’ on Windows :
Address: \\AUSTRAL\quantum
Login: quantum
password: pass (default)
To add or change a share directory:
sudo nano /etc/samba/smb.conf
Add at the end of smb.conf:
[myShare]
path = /myDirectory
writeable = yes
create mask = 0700
directory mask = 0700
public = no
Allow users to access share folders or change the default password:
sudo smbpasswd -a quantum -> Default password : pass
Restart service after smb.conf modifications :
sudo systemctl restart smbd
Service status :
sudo systemctl status smbd.service
Stop the Samba service :
sudo systemctl stop smbd.service
Get samba configuration :
testparm -s
The default smb.conf is set for the WORKGROUP domain, to get the windows domain name :
net config workstation
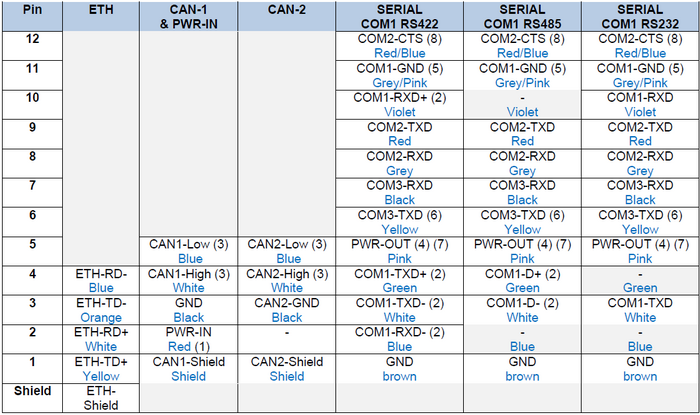
5.6. Serials
Pinouts :
List all the ports:
ls -l /dev/tty*
You must see the 3 used ports:
/dev/ttyS0
/dev/ttyAMA1
/dev/ttyAMA2
You can test the ports with minicom :
sudo apt update -y
sudo apt install minicom -y
sudo minicom -D /dev/ttyS0
You can also test in bash command :
COM2 = ttyAMA1 : RS232 port (uart3 with CTS for PPS input on GPIO6) :
# Configure
stty -F /dev/ttyAMA1 speed 4800 cs8 -cstopb -parenb

# Read
cat /dev/ttyAMA1

# Write
echo -e "TX COM2 Working \x0D\x0A" > /dev/ttyAMA1
COM3 = ttyAMA2: RS232 port (uart5) :
# Configure
stty -F /dev/ttyAMA2 speed 4800 cs8 -cstopb -parenb

# Read
cat /dev/ttyAMA2

# Write
echo -e "TX COM3 Working \x0D\x0A" > /dev/ttyAMA2
COM1 = ttyS0 : Multifunction port (uart1 with hardware RTS1 and a RS485/MODBUS/422 selection) :
By default this port is configured in RS232 with RTS.
RS485_MODE (GPIO24) is used for RS485/MODBUS/RS422 selection.
RTS1 (GPIO17) is used for the high/low impedance control in RS485/MODBUS mode.
!!!! Warning : If you have an isolated hardware, connect your ground wire to COM1-GND !!!!
# Set RS485_MODE (GPIO24) ports as output
echo "24" > /sys/class/gpio/export
echo "out" > /sys/class/gpio/gpio24/direction

# Then configure in RS232 mode
echo "0" > /sys/class/gpio/gpio24/value

# Or configure in RS485 mode
echo "1" > /sys/class/gpio/gpio24/value

# Configure
stty -F /dev/ttyS0 speed 4800 cs8 -cstopb -parenb

# Read
cat /dev/ttyS0

# Write
echo -e "TX COM1 Working \x0D\x0A" > /dev/ttyS0
Replace COM1 with the linux serial console :
For debug purposes, you can activate/desactivate a debug console with
sudo raspi-config
Interface Options -> Serial Port -> Shell accessible over serial -> Yes
5.7. CANbus
Verify the configuration :
ifconfig
You must see can0, can1 and vcan0 peripherals, and rx/tx packets status. Alias :
- can0 -> CAN2 Isolated - Secondary CANbus port (near Serials M12)
- can1 -> CAN1 with PowerIn - Main CANbus port (near Ethernet M12)
- vcan0 -> Virtual CANbus for development
You can also see the status with :
ip -s -d link show can0
ip -s -d link show can1
You can check for a hardware problem with :
dmesg | grep -i -E "(mcp|spi)"
Must give :
[    8.719339] mcp251x spi1.2 can0: MCP2515 successfully initialized.
[    8.745038] mcp251x spi0.1 can1: MCP2515 successfully initialized.
Change baudrate :
sudo /sbin/ip link set can0 up type can bitrate 250000
Receive sentences test :
candump can1       -> CAN1 (PowerIn near Ethernet M12)
candump can0       -> CAN2 (Isolated near Serials M12)
Transmit sentences test :
cansend can1 7DF#0201050000000000
cansend can0 7DF#0201050000000000
Pthon example : https://www.waveshare.com/wiki/2-CH_CAN_HAT#.E3.80.90Python_example.E3.80.91
5.8. Real Time Clock
To verify the RTC chip response on I2C bus :
sudo i2cdetect -y 1
You must see UU or 68 at Address 0x68
To program the RTC :
sudo hwclock -D -r
date
sudo hwclock -w
sudo hwclock -r
5.9. Logo backlight
To test the LED :
# Set Led port as output
echo "27" > /sys/class/gpio/export
echo "out" > /sys/class/gpio/gpio27/direction

# Led ON
echo "1" > /sys/class/gpio/gpio27/value

#led OFF
echo "0" > /sys/class/gpio/gpio27/value
5.10. Bluetooth
Bluetooth allows you to connect a GNSS, a Remote control… to the Quantum CM4 or transform it to a voice assistant.
How to
5.11. Watchdog and OverTemperature
Tutorial : https://medium.com/@arslion/enabling-watchdog-on-raspberry-pi-b7e574dcba6b
Settings :
sudo nano /etc/watchdog.conf
sudo nano /etc/default/watchdog
Start the service :
sudo systemctl start watchdog
5.12. Optional PWM
COM3-TXD (TXD5) output may be use as PWM0 (PIN 6 of the M12 connector).
Note: With a factory hardware modification PWM0 can also replace PWR-OUT on the PIN5 of the M12 connector.
Contact us for more information.
5.13. Thermal Stress Test
If your installation does not follow the recommendations (bare boards, flat mounting…), you must do a thermal test under load.
Stress the CPUs:
sudo apt install stress-ng mesa-util
stress-ng --cpu 0 --cpu-method fft
Open 3 others consoles and verify the CPUs Temperature, the current cores clocks speed (1500Mhz) and the throttle:
watch -n 1 vcgencmd measure_temp
watch -n 1 vcgencmd measure_clock arm
watch -n 1 vcgencmd get_throttled
Throttle Status :
0: under-voltage
1: arm frequency capped
2: currently throttled
16: under-voltage has occurred
17: arm frequency capped has occurred
18: throttling has occurred
under-voltage occurs when voltage drops below 4.63V. The Quantum is throttled arm frequency capped occurs with temp > 80’C over-temperature occurs with temp > 85’C. The Quantum is throttled Throttling removes turbo mode, which reduces core voltage, and sets arm and gpu frequencies to non-turbo value. Capping just limits the arm frequency (somewhere between 600MHz and 1200MHz) to try to avoid throttling. If you are throttled and not under-voltage then you can assume over-temperature. (confirm with vcgencmd measure_temp).
Notes :
- The CPU will reduce the clock rate to try and keep its internal temperature below 85°C. Once cooled down, the clock is restored to its original frequency.
- Optimal RF Wireless performance is between -20°C and +75°C .
You can view the 3 informations using a bash script :
while :
do
  vcgencmd measure_clock arm
  vcgencmd measure_temp
  vcgencmd get_throttled
  sleep 1
  echo ''
done
You can also lauch a python script to log a long test in a csv file :
from gpiozero import CPUTemperature
from time import sleep, strftime, time

with open("/home/quantum/cpu_temp.csv", "a") as log:
while True:
    cpu = CPUTemperature()
    log.write("{0},{1}\n".format(strftime("%Y-%m-%d %H:%M:%S"),str(cpu.temperature)))
    sleep(1)
6. Applications
6.1. Remove Applications
Remove applications you installed with apt-get with:
sudo apt-get –purge remove APPNAME (replace APPNAME with the name of the app you want to remove)
To remove possible application orphans:
sudo apt-get autoremove –purge
6.2. Tools
Minicom is a simple terminal usefull to scan serials
sudo apt update -y
sudo apt install minicom -y
sudo minicom -D /dev/ttyS0
6.3 Protocols
- Lely CANOpen
- Signal K (Open marine data standard)
6.4 Databases
- WARP10 (Optimized for Geo Time Series)
- Redis (The open source, in-memory data store used by millions of developers as a database, cache, streaming engine, and message broker.)
6.5 Frameworks
- CoDeSys (Leading IEC 61131-3 development system in factory automation with powerful functions for fieldbus configuration, visualization, motion control and safety.)
- OpenPLC (The first open source, multi-hardware Programmable Logic Controller Suite.)
- ROS2 (The Robot Operating System is a set of software libraries and tools that help you build robot applications.)
- Moos-ivp (Set of open source C++ modules for providing autonomy on robotic platforms, in particular autonomous marine vehicles.)
- Node-Red (Low-code programming for event-driven applications for IoT)
- TensorFlow Install / Versions (AI)
- PyTorch (AI)
7. Operating systems links
- VxWorks (Chosen for the Mars rovers) :
- Build your own small footprint embedded Linux :
- Generic Headless Linux distributions :
- Specialized linux distributions :
- Bare Metal & RTOS :
- Bare Metal
- CircuitPyton (Bare Metal Python)
- FreeRTOS (RTOS)
- ChibiOS (RTOS)
Disclaimers
Copyright (C) 2022 Austral Electronics SARL. Changes to the specifications and features in this manual may be made by Austral without prior notice. Specifications and information provided in this manual are for informational use only. Austral assumes no responsibility or liability for any errors or inaccuracies that may appear in this manual including the product & / or software. All trademarks mentioned in this manual are property of their respective owners. This product contains copyrighted software which are released under multiple open source licenses including but not limited to the GNU GPL, LGPL, and MIT BSD licenses. Such software is provided without warranty. Copies of these licenses are included in the software itself in further detail. For the latest up to date information, please visit our Github Repository at https://github.com/austral-electronics/QuantumCM4
